Today I will try to explain something, which can be easy to write in plain old school form management in php, but which is quite tricky for new comers with the sfForm framework. Let’s say you want a form to edit relationship options: users are linked to a group, each user can have different options and can be authorized to edit the group.
To keep this example simple, I am not using any database or Propel/Doctrine model. This will show how a form can be displayed to the end user:
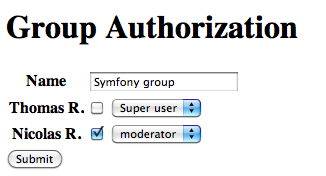
Group name: [text input]
Authorization:
  label: [entry 1] , is_authorized: [checkbox element] , options: [select box]
  label: [entry 2] , is_authorized: [checkbox element] , options: [select box]
  label: [entry 3] , is_authorized: [checkbox element] , options: [select box]
  label: [entry 4] , is_authorized: [checkbox element] , options: [select box]
Old school php
When you submit this form (old php), you will get an array where the user_id is the hash key of the authorisation array.
users[id_entry_1]['enabled'] = 'on';
users[id_entry_1]['options'] = 1;
users[id_entry_2]['enabled'] = 'on';
users[id_entry_2]['options'] = 2;
users[id_entry_3]['enabled'] = 'on';
users[id_entry_3]['options'] = 1;
users[id_entry_4]['options'] = 3;
So in old school php, to handle this data you will naturally do :
<?php
foreach($users as $user_id => $values)
{
    // do the logic here
}
And to display the data you will do :
<?php
echo "<input name='name' type='text' value='$group_name'/>";
foreach($entries as $user_id => $values)
{
    echo $values['name']."<br />";
    echo "<input type='checkbox' name='entries[$user_id][enabled]' value='${values['enabled']}' />";
    echo "<select name='entries[$user_id][options]'>";
    foreach($options as $option_id => $value)
    {
    echo "<option value='$option_id' selected='".($option_id == $values['option'] ? 'selected' : '')."'>$value</option>";
    }
    echo "</select>";
}
sfForm discussion
How this code can be translated into a sfForm? Some people will go with a GroupForm, which has a name widget, and they will include the authorization into different embedded form. This can do the trick but:
- you can’t have an proper $users array where hash key are the
user_id - you can’t have customized lines (2 or 3 widgets per line)
- and of course this will does not help to understand how a sfForm works.
Let’s talk about the sfForm framework, this framework helps developers to create forms in an Object Oriented way. Advantages: easy decoupling, easy testing and easy validating. Disadvantages: sometimes it takes longer to write the form logic and then the presentation.
The sfForm has 4 main objects :
sfWidgetFormSchema: contains the references of all widgets.sfValidatorFormSchema: contains the references of all validators for the associated widgets, and also contains specific validators: pre and post validators which can be used to pre-check if the values are ok and post updated values.sfErrorFormSchema: contains the references of any errors generated by the validator when the values are bound to the form.sfFormFieldSchema: mainly used when the form is rendered, it contains the name and the value of each widget.
These objects implement the ArrayAccess interface, that means they can be used as a standard array. And so each object can be a child of another object from the same class in an array way, like :
<?php
$schema = new sfWidgetFormSchema;
$schema['options'] = new sfWidgetFormSchema;
And of course you can add standard widgets :
<?php
$schema['options']['enabled'] = new sfWidgetFormCheckbox;
$schema['name'] = new sfWidgetFormInputText;
This logic can be applied to : sfWidgetFormSchema, sfValidatorFormSchema, sfFormFieldSchema and sfErrorFormSchema.
sfForm way
Let’s go back to the form. We need first to create the form (take a deep breath :)):
<?php
class GroupAuthorizationForm extends sfForm
{
    public function configure()
    {
    // create the widget and validator for the group name
    $this->widgetSchema['name']  = new sfWidgetFormInput;
    $this->validatorSchema['name'] = new sfValidatorString;

    // create the widget and validator SCHEMAS for users' options
    $this->widgetSchema['users'] = new sfWidgetFormSchema;
    $this->validatorSchema['users'] = new sfValidatorSchema;

    // define options, should be better in a proper class, ie : UserGroupAuthorization::getOptionTypesList()
    $options = array( 1 => 'Super user', 2 => 'moderator', 3 => 'user');

    // loops through the group's users and create the corresponding widget
    foreach($this->group['users'] as $user)
    {
        // create a new sfWidgetFormSchema which hold the user's widgets
        $user_widget_schema = new sfWidgetFormSchema;
        $user_widget_schema->addOption('username', $user['name']);
        $user_widget_schema['enabled'] = new sfWidgetFormInputCheckbox;
        $user_widget_schema['option'] = new sfWidgetFormSelect(array(
        'choices' => $options
        ));

        // create a new sfValidatorFormSchema which hold the user's validator
        $user_validator_schema = new sfValidatorSchema;
        $user_validator_schema['enabled'] = new sfValidatorBoolean(array(
        'required' => true,
        ));
        $user_validator_schema['option'] = new sfValidatorChoice(array(
        'choices' => array_keys($options)
        ));

        // attach the user's schema to the 'options' schema
        $this->widgetSchema['users'][$user['id']] = $user_widget_schema;
        $this->validatorSchema['users'][$user['id']] = $user_validator_schema;
    }
    }
}
At this point the form is not ready, but the main logic is defined. Some of you might have notice that the $this->group['users'] is not defined at all. Let’s add a few more lines:
<?php
class GroupAuthorizationForm extends sfForm
{
    protected $group = null;

    public function __construct($group, array $options = array(), $CSRFSecret = null)
    {
    // in this case $group is an array
    $this->group = $group;
    $defaults = $group;

    parent::__construct($group, $options, $CSRFSecret);
    }

    public function configure()
    {
    // cut
    }
}
So to initialize the form in the controller, you will do :
<?php
// adapted this initialization ;)
$group = array(
    'name' => 'Symfony group',
    'users' => array(
        0 => array(  'id' => 1, 'name' => 'Thomas R.', 'enabled' => true, 'option' => 1),
        1 => array(  'id' => 1, 'name' => 'Nicolas R.', 'enabled' => true, 'option' => 1),
    ),
);

$form = new GroupAuthorizationForm($group);
And to display the form:
<?php
<form method="POST" action="" />
    <table>
    <?php echo $form ?>
    </table>
    <input type='submit' />
</form>
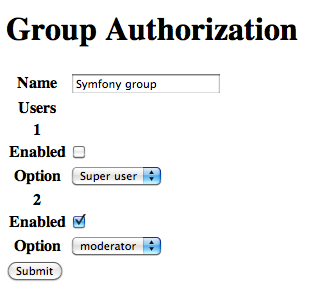
The form will be display as expected with the default table formatter

The current implementation has one issue: the user name is not displayed. We need to add an option in the form then we cannot use the <?php echo $form ?> anymore. Please keep in mind the <?php echo $form ?> is only for prototyping.
Edit the GroupAuthorizationForm and add an option to the $user_widget_schema :
<?php
$user_widget_schema = new sfWidgetFormSchema;
// add user information into the user widget schema $user_widget_schema->addOption(‘username’, $user[‘name’]);
Edit the template file
<?php
<form method="POST" action="" />
    <?php echo $form->renderHiddenFields() ?>

    <table>
    <?php echo $form['name']->renderRow() ?>
    <?php foreach($form['users'] as $user_form_field_schema): ?>
        <tr>
        <?php
            // When a form is used as an array, the form always return an sfFormField instance.
            // In this case it is a sfFormFieldSchema.
            // the getWidget return an instance of sfFormWidgetSchema
        ?>
        <th><?php echo $user_form_field_schema->getWidget()->getOption('username') ?></th>
        <td>
            <?php echo $user_form_field_schema['enabled']->render() ?>
            <?php echo $user_form_field_schema['option']->render() ?>
        </td>
        </tr>
    <?php endforeach; ?>
    </table>
    <input type='submit' />
</form>

Conclusion
I hope this article will help you to understand a bit more about the sfForm framework. For the new comers who are reading this article, don’t be afraid. It is just a new way to handle data: widget definition, validation and presentation.